


This past summer, I decided to delve more into the world of cooking as I’ll be cooking for myself this year at school and for the remainder of my life (barring me making a crazy amount of money where I can hire a personal chef). So, my friend Giovanni and I teamed up and cooked a couple of complex, time consuming dishes. And for those wondering, yes, he’s Italian and has the stereotypical cooking skills that come with being from Italy.
We’ve cooked together before, making pizza a few times, deep fried cheeseburgers (I have photo evidence) and an assortment of other medium-level dinners and desserts. Now, as we entered our senior year of college, we decided to up the ante.
There has always been a dish that we joked about making, but never had the yambags to actually follow through with.
“It’ll take too much time”; “The ingredients are too expensive,” we both said simultaneously.
That dish is Beef Wellington, the signature dish of should-be Iron Chef Gordon Ramsay. It was June 2 that we decided to tuck our shirts in and do it.
The first step was finding a recipe, which was probably the easiest part of the dish. We chose to work with Gordon Ramsay’s signature Christmas Beef Wellington. It felt a little unnatural for me because I’m Jewish, but I rolled with it.
A key to making any dish pop is the ingredients. If you use bad ingredients, the food will not turn out as you may hope even if you follow the recipe to a tee. Luckily for us, Whole Foods is a five-minute drive from where we live. We went and bought one-and-a-half pounds of beef tenderloin, four different types of mushrooms (shitake, cremini, enoki and oyster), Parma ham, puff pastry, English mustard, fresh thyme and a couple more ingredients that should be in everyone’s kitchen.
We began the process by trimming the beef, which was also our first mistake. When buying beef from a butcher, it is standard practice to ask them to trim the cut. We did not do that, so I had to do it. It was then that I realized my knife skills were not up to par. We wanted the beef to be in a cylindrical shape, but it ended up with a noticeable divot in the tenderloin. Whatever. Next step was to sear the beef in a pan. This is where I made my second and potentially most costly mistake. I turned my stove all the way up, put some oil in it, got distracted and in a matter of seconds the fire alarm in my house was exclaiming “FIRE, EVACUATE, FIRE, EVACUATE,” over and over. Luckily Giovanni intervened and took the pan outside to prevent further damage. I did some breathing exercises to calm myself down, then we got back on track.
I heated up the pan again, payed attention to it the whole time, and seared the beef. When searing it is crucial to sear every part of the tenderloin since it adds great flavor.
We immediately brushed the recently seared beef with one layer of English mustard. The mustard adds a slight tang to the beef, calming the other rich flavors in the dish.
Then came the mushrooms. We threw all the mushrooms into a food processor with a clove of garlic, pinch of salt and two sprigs of thyme. Once ground into a paste, the mushrooms were moved into a dry pan on medium heat. This is the most important part of process, since mushrooms are naturally full of water. Heating the mushrooms evaporates the excess moisture, thus preventing sogginess in the final product. It took 10 minutes to dry the mushroom paste.
Now for the assembly. We began by placing a large piece of plastic wrap on the table. We made sure to use more than we needed, and we ended up using way more than necessary. The first layer was the Parma ham. We layered the ends each slice, eyeing the amount so it would wrap around the entirety of the tenderloin. Next, we spread the mushroom paste to cover every bit of the Parma ham. Next came the beef, which had cooled to room temperature.
Now we had to wrap the Beef Wellington into its cylindrical shape. We rolled the tenderloin like a burrito, tightening it as much as possible. The wrapped beef in plastic wrap was transferred to the refrigerator where it chilled and took shape for thirty minutes. In the meantime, we laid out the defrosted puff pastry onto another large sheet of plastic wrap then laid the unwrapped beef into onto the long edge of the puff pastry. Again, we rolled the Beef Wellington burrito as tight as possible and let it chill within its plastic wrap cocoon for two hours. It is recommended to let it chill overnight, but the boys were hungry.
When the clock struck 6 o’clock, we unwrapped our creation and prepared it for baking. We brushed egg yolk over the entirety of the dough and made subtle incisions to create an attractive design.
We could finally play the waiting game. The oven was ripping at 400 degrees Fahrenheit, and we let it cook for 35 minutes to a solid medium.
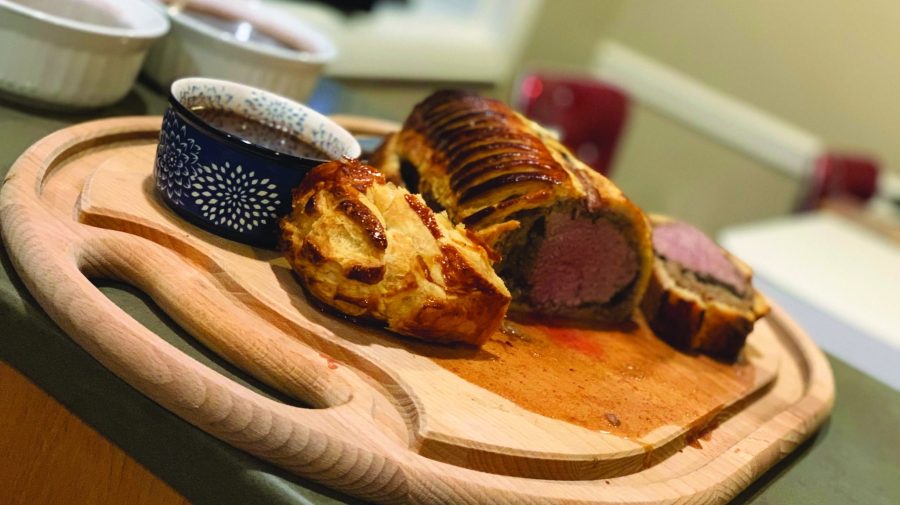
The final product was nothing short of exceptional. Two more of my friends, Eugene and Jonah, came over to taste the final product. We did a brief photo-shoot while it was cooling. My pictures were terrible, but Eugene caught the perfect shot to display our masterpiece.
Giovanni, Eugene and I dug in to our succulent offerings which were nothing short of amazing. Jonah had to sit and watch us chow down since he stays away from pork. I try to do that too, but I’m batting .700 in that department.
I’d explain how it tasted, but I’d rather you find out for yourself.